When building a web application one of the common pitfalls are long running tasks that limit the ability for the server to respond to requests. Ideally these long running tasks will be sent to a separate process that can run asynchronously freeing up the web server to respond to additional requests.
How do you efficiently notify the end user when the task has been completed?
One option would be to store the result in a data store somewhere and write some JavaScript that continuously polls the back-end data store for the status. Polling creates unnecessary requests to the server and queries to a back-end database. A better option would be to leverage web sockets to send messages from the long running tasks to the end user. This can be achieved using SocketIO along with a message broker such as RabbitMQ.
In this blog we will demonstrate how to use Flask, Celery, RabbitMQ and SocketIO to offload long running tasks and push notifications to the client when a task has completed. All of the code that is referenced in this blog is available in the DataRoadTech github repository.
For this tutorial we will be running Flask on an Ubuntu 14 environment with Python 2.7.
Creating the Flask App:
We will start by installing Flask and creating a simple web application with a long running task.
- sudo pip install flask
Next we will create a directory for the application and for our html template.
- mkdir demo
- cd demo
- mkdir templates
We will need to create a template that Flask can render (index.html) with the following html code in it.
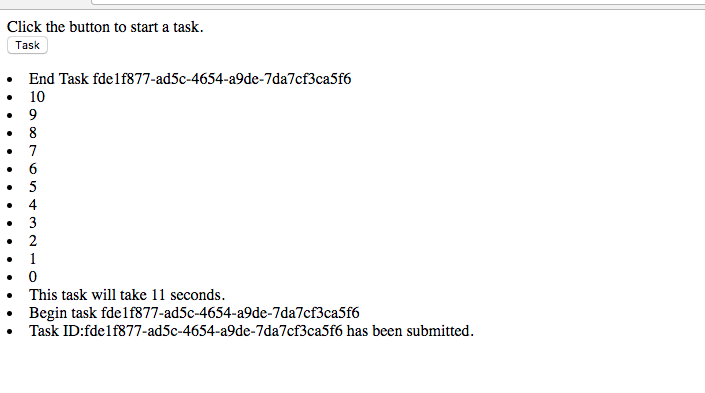
- the button will submit a task to the server using the route /runTask.
- results will be placed in the div with the id Results.

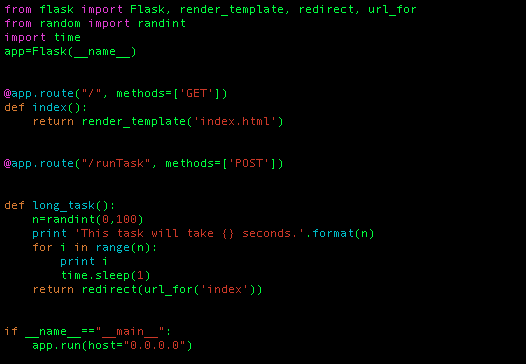
Next we create a file www.py which will contains our flask application. There will be two routes:
- Render the web page (index.html)
- A sudo long running task that will generate a random number between 1 and 100 and run through a loop that sleeps for 1 second in between each iteration.
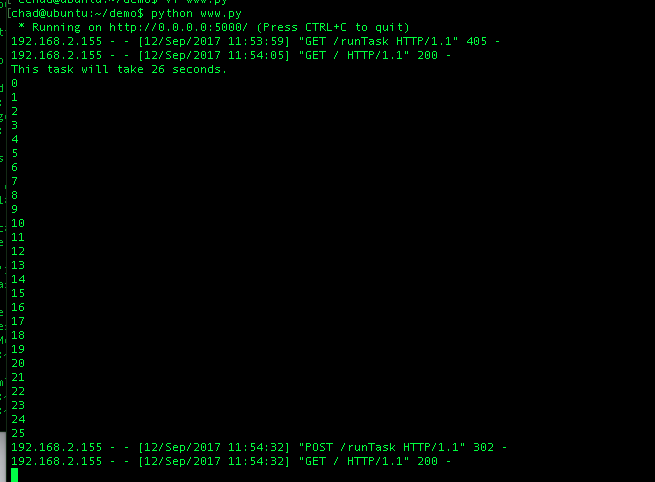
You can now start the application by running python www.py and type in the IP address of your server or localhost. The Flask application will be running on port 5000. If you click the task button you should see that the web page will wait for a response before returning. You should see each number print to the screen in your console window as the server executes the task.
Using Celery to execute the task asynchronously
Next we are going to offload this task to Celery, in order to do so we will need to install Celery in Python as well as RabbitMQ as the message broker. This can be done with the following commands.
- sudo pip install celery
- sudo apt-get install rabbitmq-server
Create a new file and name it tasks.py we are going to create a Celery app and move our long running task to this file. The task requires a decorator (@celery.task) so that Celery knows that this is a task that can be executed. We will modify the long_task so that it accepts the random number as an input.

Then we will modify the www.py file removing the import of the time package since this is no longer needed and import the newly created tasks object. Once the imports have been added we will add a call to the celery task. In order to execute this task asynchronously we must add the delay method after the task method and put the arguments there. The www.py file should now look like this.

In order for Celery to to execute the task we will need to start a worker that listens to the queue for tasks to execute. Open another terminal window, go to the demo folder and execute the following command.
- celery -A tasks worker –loglevel=info –concurrency=4
Next you can restart your flask app by running python www.py
If you open a browser window and click the task button you should see the task running in the celery worker console window.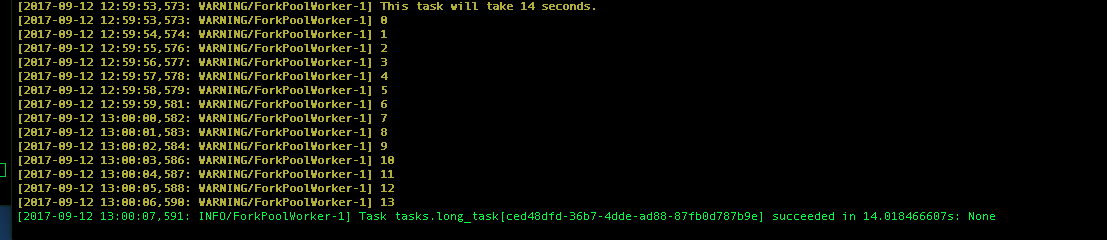
SocketIO
Now that we have successfully offloaded the long running task from flask to the celery worker it would be nice to be able to see the results of this task in the web browser. There are a couple ways to do this. One way is to store the results of the celery execution and continuously poll the results backend until the task is complete. However this creates quite a few unnecessary requests. A better solution will be to use SocketIO and push the results directly to the client.
First we will need to install the flask-socketio and gevent package. If you don’t have python-dev installed now would be a good time to do that as well.
- sudo apt-get install python dev
- sudo pip install flask-socketio
- sudo pip install gevent
We will create a new vhost in Rabbitmq to route our SocketIO messages and give permissions to the guest RabbitMQ user. This is done in order to separate the messages being sent to communicate with celery from the SocketIO messages that are sent to the client.
- sudo rabbitmqctl add_vhost socketio
- sudo rabbitmqctl set_permissions -p socketio guest “.*” “.*” “.*”
Modify www.py
Next we will need to add the following imports into the www.py file.
from flask_socketio import SocketIO, join_room
from flask import jsonify, session
import uuid
In order to be able to send messages from celery back to the web browser we are going to leverage the message queue capabilities of Flask-SocketIO. This will allow any worker to communicate with the client. We will do this by using the newly created vhost in RabbitMQ.
socketio = SocketIO(app, message_queue=’amqp:///socketio’)
A method will be needed in order to connect with the client so we can add the following.
@socketio.on(‘connect’)
def socket_connect():
pass
After the client has connected they will need to be placed in a “room” in order to receive the messages that are being sent to them. In order to ensure messages are being sent to the correct client we will create a unique session id and store it in the flask session. We will add this to the “/” route.
if ‘uid’ not in session:
session[‘uid’]=str(uuid.uuid4())
We then add a method that the client can invoke in order to join the proper room.
@socketio.on(‘join_room’,namespace=’/long_task’)
def on_room():
room=str(session[‘uid’])
print ‘join room {}’.format(room)
join_room(room)
Some final cleanup is still needed. First, in order for us to use the flask session the app must have a secret key. We can give it one with the following line of code.
app.secret_key=”DataRoadReflect”
Second, modify the long_task method as follows. We will pass the unique session id to the task and return the taskid in json format back to the client.
def long_task():
n=randint(0,100)
sid=str(session[‘uid’])
task=tasks.long_task.delay(n=n, session=sid)
return jsonify({‘id’:task.id})
Finally we will replace the app.run call with socketio.run.
socketio.run(app,debug=True, host=”0.0.0.0″)
Your www.py file should now look like this:

Modify tasks.py
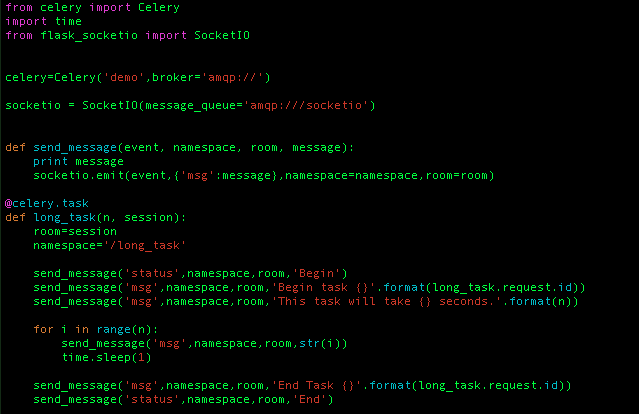
Next we need to modify the tasks.py file so that it can output the messages to the client.Next we need to modify the tasks.py file so that it can output the messages to the client.
Add the import statement for socketio.
from flask_socketio import SocketIO
Add the line to initiate the socketio instance in the task.
socketio = SocketIO(message_queue=’amqp:///socketio’)
Create a send_message method that will use the socketio.emit method to send messages to the client. We will be sending 2 types of messages 1.)Standard messages to display on the client and 2.) status messages.
Add a session input parameter to the long_task method
Last we will need to replace the print statements with calls to newly created send_message method.
The tasks.py file should now look like this.
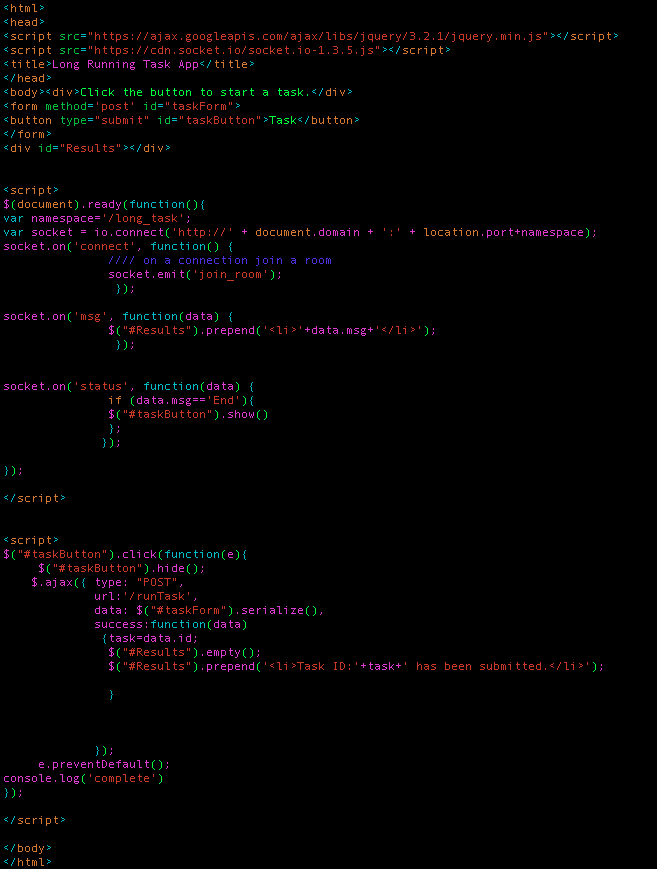
In order to be able to receive the messages and process them from SocketIO we will need to add a bit of JavaScript to the index.html file.
In the header block we will need to add the following to add jQuery and the JavaScript socketio library.
<script src=”https://ajax.googleapis.com/ajax/libs/jquery/3.2.1/jquery.min.js”></script>
<script src=”https://cdn.socket.io/socket.io-1.3.5.js”></script>
We can also modify the form by removing the task and adding id=”taskForm”
Finally we will add some JavaScript to send the runTask event to the webserver using ajax and write a message indicating that the job has been submitted. A second script will connect to the web socket to listen for and process messages. You will note that the “Status” message is used to determine when to re-display the Task Button.
Once you have saved your file you can restart the web app, celery worker and navigate to the long running task page. When you run a task the results should now display directly on the web browser.